The dead hang is one of those exercises that almost looks too simple to be effective. You grab a pull-up bar, lift your feet off the ground, and just hang. There is no complicated equipment, no fancy dynamic movements, and no heavy iron to load.
That is exactly why so many people underestimate it.
The truth is, there is a massive difference between simply hanging from a bar and executing a perfectly dialed-in dead hang. Small adjustments in your grip mechanics, shoulder positioning, and total-body alignment can completely transform how the exercise feels and what physical adaptations you get out of it.
If you have already learned about the benefits of dead hangs—or you’ve read up on our common dead hang mistakes to avoid—this guide is your essential next step. Think of it as your complete, technique-focused roadmap to mastering the exercise. Below, we break down proper dead hang form, the most effective variations, crucial training tips, and exactly how to program dead hangs to build upper-body resilience.
What Exactly Is a Proper Dead Hang?
At its core, a dead hang is an isometric bodyweight exercise where you suspend yourself from an overhead bar with your arms fully extended, supporting your entire body weight without actively pulling yourself up.
Sounds simple, right? It is conceptually simple, but you shouldn’t mistake simple for easy.
A proper dead hang requires your hands, forearms, shoulders, upper back, and core to work in unison to keep your body structurally stable. Even though you are not generating upward movement, your nervous system and muscles are constantly making micro-adjustments to maintain balance and secure your grip against the relentless pull of gravity.
Unlike dynamic pulling exercises like rows or pull-ups, the goal here isn’t to create movement. The objective is to remain perfectly controlled from the moment your feet leave the floor until the moment you safely step back down. If you find yourself swinging aggressively, twisting, or constantly needing to readjust your hands, your body is revealing weak points in your technique that need to be addressed.
Setting Up for Success: Before You Hang
One of the biggest reasons people struggle with shoulder discomfort or poor grip endurance during dead hangs is that they rush the setup phase. The exercise does not begin when you are already hanging in the air. It begins before your feet even leave the floor.
- Choose the Right Bar: Start by choosing a sturdy, suitable pull-up bar that is tall enough for your body to hang freely without your feet touching the ground. If you are shopping for one, see our best pull-up bars for home in India guide.
- Step Up, Don’t Jump: If the bar is out of reach, use a small plyometric box, step, or bench to reach it. Jumping up and abruptly catching your entire body weight can shock your shoulder joints and immediately compromise your starting position.
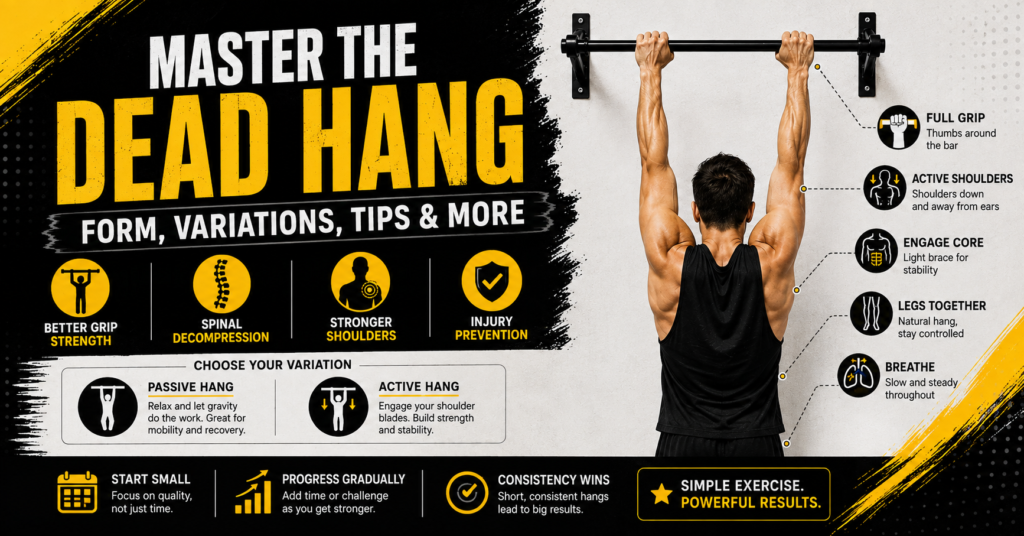
- Establish Your Grip: Place your hands just slightly wider than shoulder-width apart. Wrap your thumbs completely around the underside of the bar. This full “hook” grip gives you far more control and drastically reduces slipping as your forearms fatigue.
Master Your Dead Hang Form
Good technique isn’t just about looking perfectly straight. It is about creating a structural position that your body can hold safely, efficiently, and effectively for extended periods. Here is exactly what you should focus on from head to toe.
1. Grip and Forearms
Your hands should wrap completely around the bar with your thumbs locked securely underneath. Avoid the “suicide grip” (thumbs over the bar) unless you are an advanced athlete specifically training finger strength. Grip the bar firmly enough to secure your weight, but avoid over-squeezing in the first ten seconds, which will prematurely burn out your forearms.
2. Shoulder Positioning
Your shoulders should stay controlled without forcing an exaggerated shrug. Aim for a position that feels stable and comfortable rather than trying to force the shoulder blades into a single “correct” position. If the hang produces sharp or persistent shoulder pain, stop rather than pushing through it.
3. Arm Extension
Keep both arms fully extended throughout the entirety of the hold. If your elbows begin to bend slightly, it is usually a compensatory sign that your grip strength is reaching its limit and your body is trying to recruit your biceps to help hold you up.
4. Core and Leg Alignment
You do not need to squeeze your abdominals with maximum effort like you would in a heavy plank. However, a gentle brace—tucking your ribs down slightly—is enough to keep your body from swaying. Let your legs hang naturally straight down, or lightly cross your ankles to create a single, tight column of stability.
5. Steady Breathing
Avoid deliberately holding your breath for the duration of the hang. Use steady, controlled breathing that you can maintain comfortably rather than forcing a specific breathing pattern.
Active Hang vs. Passive Hang: Understanding the Difference
To an outside observer, these two variations look nearly identical. In reality, they train your body in distinctly different ways and serve completely different purposes in a well-rounded fitness program.
If you are working on how to do pull ups at home, the active hang is a useful progression for learning shoulder control. It is not a mandatory prerequisite for every trainee, but practicing it can help beginners understand how to initiate a controlled pull from the hanging position.
5 Dead Hang Variations to Level Up Your Routine
Once a standard, bodyweight dead hang starts feeling comfortable for 60 seconds or more, you do not always need to just hang on for dear life to see progress. Changing the variation can challenge your neuromuscular system in completely different ways.
1. Scapular Pull-Up Hangs
This variation focuses strictly on shoulder control. While hanging passively, keep your arms completely straight and gently pull your shoulder blades down and back, transitioning into an active hang. Hold for two seconds, then lower back to a passive hang. It is one of the single best exercises for learning proper back engagement.
2. The Towel Hang
Instead of gripping the rigid pull-up bar directly, drape two thick towels evenly over the bar and grip the fabric. The unstable, thick grip forces your crush grip and forearms to work exponentially harder, making this a favorite drill for martial artists and climbers.
3. Assisted Single-Arm Hang
Hold the bar firmly with one hand while the opposite hand lightly grasps the wrist of the hanging arm (or holds a resistance band) for support. This variation gradually exposes your shoulder capsule to the demands of a one-arm hang without placing 100% of your body weight on a single joint all at once.
4. Weighted Dead Hangs
If bodyweight hangs no longer fatigue you, securely fasten a dip belt with a light weight plate around your waist. Adding resistance speeds up grip strength gains, but you should only introduce weighted hangs after your bodyweight technique is completely flawless.
5. Flexed Arm Hang
Unlike a traditional straight-arm dead hang, this variation requires you to pull yourself up until your elbows are bent at 90 degrees (or chin above the bar) and hold that static position. It places massive tension on your biceps and upper back, building the specific isometric strength needed to clear the toughest part of a pull-up.
Training Tips: How to Get More Out of Every Rep
Improving your hang time isn’t just about gritty endurance; it is about building smarter training habits.
- Warm Up First: Never jump onto a bar perfectly cold. Spend three to five minutes preparing your shoulders with dynamic arm circles, resistance band pull-aparts, or light wrist rolls. Warm connective tissues move better and recover faster.
- Train Grip Outside the Hang: Don’t rely solely on the bar. Exercises like heavy farmer’s carries, dumbbell holds, and plate pinches build comprehensive grip strength that translates directly into a stronger, longer dead hang.
- Prioritize Consistency Over Intensity: Doing three moderate sets of 30-second hangs, three times a week, will produce far better long-term structural adaptations than destroying your hands in a single five-minute marathon session once a month.
- Finish Safely: When your set is over and your grip is failing, do not abruptly let go and drop from the bar. Use your step or box to step down safely. Dropping suddenly forces your lower back and knees to absorb unnecessary shock while your core is fatigued.
Integrating Dead Hangs Into Your Workout
Because they are incredibly versatile and require zero setup time, dead hangs fit effortlessly into almost any training routine.
If you want to prepare your nervous system for heavy lifting, perform 2-3 sets of 15-second active hangs during your warm-up to turn on your lats and grip. If your goal is improving flexibility, mobility, and feeling decompressed after a long day at a desk, utilize passive hangs at the very end of your workout as a cooldown.
Ultimately, mastering the dead hang is about honoring the basics. Don’t chase someone else’s viral hang times on social media. Focus on your setup, maintain strict alignment, and let your progress happen naturally. When you execute the dead hang with perfect form, it stops being just a simple stretch—it becomes the ultimate foundation for stronger shoulders, an iron-clad grip, and elevated upper-body performance.
Frequently Asked Questions
What muscles do dead hangs work?
Primarily your forearms and grip, plus your lats, shoulders, and to a lesser extent your core, which engages to keep your body stable while hanging.
How long should a beginner dead hang for?
Start with 10 to 15 seconds. Add a few seconds each week rather than rushing toward the one-minute holds you see online.
What’s the difference between an active hang and a passive hang?
A passive hang lets your shoulders fully relax under gravity. An active hang has you engage your shoulder blades, pulling them down and back, which trains more shoulder stability.
Do dead hangs help with pull-ups?
Yes. They build the grip strength and shoulder stability that make pull-ups easier, especially for beginners who aren’t ready for full reps yet.
Do dead hangs build muscle, or are they just a stretch?
Both, depending on how you do them. Passive hangs lean more toward mobility and decompression. Active hangs and weighted variations genuinely build grip and shoulder strength over time.
What is a dead hang exercise?
It’s hanging from a bar with fully extended arms and no assistance, using your own bodyweight to build grip strength, shoulder stability, and spinal decompression.
What is a good dead hang time to aim for?
Most people can comfortably build toward 30 to 45 seconds within a few weeks of consistent practice, which is genuinely enough to get real benefits.
Do dead hangs help improve your posture?
Yes. Regular hanging decompresses the spine and strengthens the shoulders and upper back, both of which support better posture over time.
What is a flexed arm hang, and how is it different?
It’s a hang with a slight bend in the elbows rather than fully straight arms. It shifts more emphasis onto the biceps and forearms compared to a standard dead hang.
How do you properly grip the bar for a dead hang?
Wrap your thumb underneath the bar for a full grip, hands roughly shoulder-width apart. This gives you more control and reduces slipping as your grip fatigues.
Do dead hangs work your forearms?
Yes, forearms and grip are the primary muscles worked, which is why dead hangs are one of the most efficient grip-strengthening exercises around.
Can dead hangs help with lower back pain?
For many people, yes. The decompression effect can relieve mild back tension, though anyone with an existing back condition should check with a professional first.
How do you progress a dead hang once bodyweight feels easy?
Move to variations like single-arm assisted hangs, towel hangs, or light weighted hangs, only once your form and hold time are fully solid.
Is a passive hang or active hang better for beginners?
Passive hangs are the better starting point since they build baseline grip endurance and mobility. Active hangs can be added once shoulder control feels stable.
How often should you practice dead hangs each week?
Three short sessions a week tends to work better than one long, exhausting one, since consistency builds grip and shoulder tolerance faster than intensity does.
Ready to Elevate Your Grip Strength?
A great dead hang starts with a reliable, sturdy setup. Make sure you have the right gear to properly train your grip and pull-ups.
Explore High-Quality Pull-Up Gear